Mick Sawaguchi
C.E.O UNAMAS Label Fellow Member of AES
Introduction
When sound elements necessary for a work are collected and extracted based on the design plan, and when there are insufficient sound effect materials in archived library materials, Foley recordings, or studio recordings, they are recorded both indoors and outdoors outside of the dedicated studio. Staff members who record material for these purposes are called "sound recordists.
When recording the sound material on Filming, it is called a "Production-sound Mixer" to distinguish it.
In terms of recording the desired sound in high quality both indoors and outdoors, the basic equipment and usage are the same, but the feature is that only a small crew is used to record regardless of the synchronization with the video.
This paper introduces tips and pitfalls for field recording with 4 or more surround sound channels instead of 2-channel stereo recording, based on the experience gained through the production of the 24 albums in the Nature Whisper series that I have produced.


1 Advantages of Field Recording
The advantage of using library materials is that no new production costs and schedules are required, but the advantages of recording new materials according to the work are as follows
⚫️ Original materials can be prepared in high quality according to the work.
⚫️ Various sound expressions can be obtained, ranging from close-ups of the same object to the entire sound.
⚫️ Outdoor recording of special vehicles such as cars, tanks, airplanes, submarines, etc. is possible.
⚫️ Realistic natural sounds such as alpine mountains, deep sea, plains, heavy snow, avalanches, waterfalls, storms, etc. that are not synthesized in the studio, enhancing the realism of the film.
⚫️ Realistic explosions and firearms, which are essential for action films.
(Even if the final audio format is Fs48KHz-24bit, there is a growing trend to record the material in high quality data such as 96KHz-24 or 192-24bit for future-proofing).
2 Field Recording Practices
2-1 Location Selection
Once the desired material is determined, a location must be selected for it. The location to be selected depends on the physical sound source, such as cars, tanks, airplanes, and so on. For physical sound sources, it is possible to record as long as the owner of the sound source is identified and a request is submitted. For natural sound recordings, it is not always possible to record the sound source as we wish, so it is advisable to make time to record them frequently. For characteristic natural sounds, we will research and select recording locations in advance.
Weapons and explosions are not freely available for recording in Japan. For such sound sources, we will go overseas or commission a recording company to do the recording. Overseas, we have the advantage of being able to record in vast deserts, plains, shooting ranges, etc., without being affected by the surrounding environment.
2-2 Seasons and time of day
The best seasons and times of day for natural sounds depend on the desired sound source. While the rustle of a forest or the flow of a river can be recorded regularly regardless of the time of day, specific sounds such as wild birds, insects, and cicadas must be selected for optimal recording during the season and time of day. Even the same sound source can change its appearance early in the morning, during the day, or at night, so it must be recorded according to the purpose of the recording.
2-3 Ambience Noise Conditions
In the modern age, there is always some kind of noise everywhere, making field recording difficult. There is no way to prevent airplanes from flying overhead, so it is important to investigate and select locations in advance, such as under flight routes and near airfields.
2-4 Permit Application
Depending on the location and the subject of the recording, please investigate whether or not you need to apply for a permit in advance and complete the application procedures. It is important to avoid cancellation on the day of recording.
2-5 Stereo or multi-channel recording?
Compared to 2-CH recording, multitrack recorders have become more popular, including 4-CH to 8-CH recorders, which allow recording of different sounds at the same time and using independent multi-channel recording to prevent distortion by setting different levels, as well as surround sound recording to take advantage of the three-dimensional sound field. It can be used for a wide range of applications from independent multichannel recording, such as recording different sounds at the same time and setting different levels to prevent distortion, to surround recording that takes advantage of three-dimensional sound fields.
3 Field Recording Equipment
3-1 Microphone / Windshield / Stand / Special Attachment
The microphone to be used should be selected as follows, depending on the type of the intended sound source.
⚫️ Focus on localization: cardioid microphone

⚫️ Focus on broad ambience: omni-directional microphone

⚫️ Emphasis is on capturing specific sound sources: Super-directional microphones

⚫️ Emphasis on capturing the vibrations and details of cars and mechanisms: miniature microphones and special microphones (contact microphones that can pick up vibrations directly, underwater sound microphones, dummy heads, etc.)


3-1-a One Point Microphone Vs Multi Microphone
For easy setup and a reliable sound field, one-point microphones for stereo and surround field recording in one body are convenient and mobile.

However, if you want to capture the sound field with a certain intent, you can also install multiple microphones individually. This method is useful when the sound sources are scattered in many different places, such as in a vast wilderness, or when the sound sources are generated in many different places, and you want to record them all at once. For example, a sports car, a steam locomotive, a power turbine, an airplane, etc. can all be recorded independently of each other.
it is possible to record gunshots in the field with a multi-track recorder by installing multiple microphones to simultaneously record the gun body, muzzle, flight and impact noises, etc. In the case of recording vast natural sounds such as prairies, deserts, and tropical rain forests, microphones can be placed at intervals of several tens of meters to capture the spatial size of the area.


Condenser microphones are increasingly used in the field. In stable weather conditions, this may not be a problem, but in hot and humid conditions, it is important to select a microphone that can operate without producing noise. In the author's experience, condenser microphones that were stored in the trunk of an airplane on an overseas recording trip were subjected to condensation on the capsule due to the sudden change from the low temperature in the cargo hold of the plane to the high temperature and humidity of the tropical country where the plane arrived, and when it came time to record, the condenser microphones produced a crackling noise! I had an experience like this. I brought a spare microphone with me, so I was able to avoid this problem...
Windshields and stands are based on the items described in the boom sound recording of Film production. The difference is that it is a basic 2-channel stereo system. Since this is not a boom operation, once the sound source is determined, a fixed stand is set up for long hours of recording, so the size and balance of the microphone to be used should be considered, and priority should be given to its weight and sturdiness so that it will not collapse in the wind.
For recording of mechanical components, the interior of a car, exhaust noise, or explosions, it will be difficult to mount a microphone on a standard microphone stand. They use a custom or special mount rig.
3-2 Cables
Unlike in the studio, weather conditions in the field are variable, so the first priority is to have strong cables and materials that will not harden even at low temperatures. Dust, dirt, mud, rain, and other contaminants must be prevented, as well as noise caused by penetration into the connectors. Rain protection and covers are also important.
3-3 Recorder/Headphone
Recorders are now available in a wide variety of models, from 2-CH portable types to 8-CH multi-track types, depending on the purpose. Portable stereo recorders with only a built-in microphone are convenient for easy recording of ambience material, but for full-scale wind protection or when you want to use an external microphone for certain purposes, we still recommend using a dedicated model. In particular, the built-in microphone type is prone to picking up rustling or other touchy noises when hand-held and recording for long periods of time, so please handle it carefully while monitoring.
The key point is what kind of recording media should be used? Battery life, abundance of input/output terminals, visibility of level meter, microphone S/N of preamplifier and support for high gain
Whether functions such as peak display, recording capacity and remaining battery indication are easy to use.
The recorder's coverage is for heavy-duty use. In field recording, you never know what might happen, so heavy-duty is important for peace of mind and reliability.
Headphones should be sealed headphones that can be monitored at a sufficient volume even in noisy environment.
3-4 Power Supply and Recording Media/Backup
Battery life is a key factor in field location shooting, so make sure you have enough batteries, including spares. Some models have a separate spare battery case, which is convenient for quick replacement. Alternatively, a spare power supply can be connected from an external input and switched. Recording media have become smaller and larger, from SD-SDHC-SDXC cards, which is a good trend for long-time recording.
Once you have finished recording, save the recording to backup media after you return to your destination or studio and make sure you have enough space for the next day's recording.
4 For a trouble-free recording
4-1 Check the equipment in advance to make sure it is ready.
Unlike in a studio, once you are on location, it is impossible to respond quickly to any problems. To avoid risk, careful advance preparation is essential. If you bring your equipment out on the day of the location only to find that it does not work when you are ready to record on location, you may find yourself in the situation of "Oh, no..." or "It doesn't work! The following checks, including those for spare parts, should be performed in advance to avoid such problems as "Hey, it doesn't work!
⚫️ Check all connections from the entrance to the recording outputs to be used at the location. For monitor headphones, check for noise coming from the microphone, cables, and connectors. If there are parts such as PAD, LPF/HPF, and phase switch SW limiter settings on the microphone input, check if they are in the necessary positions.
⚫️ Check the recording format: Are the Fs and Bit settings in the desired format? Are the date and time settings, correct? Are the settings for recording time code, correct? For multi-channel recording, check the recording track settings, monitor output settings, and monitor balance settings, as some models allow the monitor balance to be changed.
⚫️ Set the pre-roll time. Pre-roll is a function that allows you to record before the actual recording starts without missing the recording timing. If the type of recorder allows you to set a reference marker for the recording level at which you can record, set it as well, and record at as high a level as possible.
⚫️ Check and set the limiter operation. Check to see how well the limiter built into the portable recorder operates at any input level and whether its sound quality is acceptable, and if so, bypass it.
b Confirmation of recording media operation and formatting Mirroring settings
Most recording media use solid-state memory such as SSD SD cards. Some recording media are not guaranteed to be compatible by the recorder manufacturer, even if they have the same memory media and capacity, so be sure to select compatible media and manufacturer by referring to the recommended specifications. In the field, freeze or playback failure must be avoided.
If the media is new, it must be formatted, but there is a difference in the maximum recording capacity within a single file depending on the format. For normal Fs 48KHz-16bit, there is no particular problem, but for recording large data such as Fs 96KHz-192KHz 24bit, the maximum recording time differs depending on the format and number of recording channels.
Comment-In FAT32 and NTFS formats
FAT32: FAT32 is a file system adopted from Windows 95 OSR2, a later version of Windows 95, and supports up to 2TB (1TB = 1,024GB). However, the maximum size of a single file is 4 GB. If the recording material exceeds 4 GB, it will be recorded as a separate file.
NTFS: NTFS is a file system adopted from Windows NT. Compared to FAT32, NTFS can be created up to the maximum capacity of the drive used, allowing the same sound source to be recorded in one file for a long time.
Mirroring for risk avoidance
Some models allow two types of recording media to be installed, so mirroring can be set up for production/backup recording.
c. Prepare spare equipment such as batteries, cables, recording media, etc.
It is also important to check your spare equipment. Fully charged batteries, spare batteries or ext.-batteries.
Check spare equipment such as spare cables and pre-formatted recording media. If you are recording in the dark, you will need insect repellent, disinfectant, and a head-mounted light.
d. When recording, provide recording information such as location, date, time, and content in your voice as slate.
At the recording site, record the recording information in your voice on the recording source itself as well as in your notes. The content should include the location, date and time, what the sound source is, and what the situation is like. This is a good habit to get into when organizing your recordings, as it is easier and quicker to edit than searching through your recording notes.
e. Record at least 30 minutes of natural sound recordings, as each recording is a once-in-a-lifetime event.
Nature is a stable condition and unexpected so, the sound changes every day, even in the same location. A feeling of "I'll come back next time" is nothing but a regret later on. It is a good idea to record any sound sources you come across and think "this is it" at that time. The recordist luck is a key with patience!
You can decide later how to use it, so be patient and record it for a long time. Especially with natural sounds, you should record at least 30 minutes, because the ambient noise will be included in addition to the target sound, and during the editing stage, you can create a usable sound.
f Reference Level Setting and W Recording
⚫️ If the model allows a reference level marker to be set on the level meter display, set the marker as a reference for the recording level. For example, -12 -10 -8 -6dbFs level point. This will make it easier to set the optimum level for each sound source material, and will also enable recording with a good signal-to-noise ratio. This is especially important for low-level ambience recordings to ensure a good signal-to-noise ratio. It is not possible to obtain good quality material by simply "normalizing it later on your DAW. The level meter also displays the area below -20dbFS, so at first glance it appears to oscillate at a large level, but the guideline for maintaining quality is in the range from there to 0dbFS. Some models have a function to cut off the low-level display area and magnify only the level area above -20dbFS, which is very practical.
⚫️ W recording settings for unpredictable explosion sounds
When recording once-in-a-lifetime events such as huge explosions, fireworks, or water spray from tanks and Thunder, it is difficult to set the proper level on the spot unless you are very experienced, resulting in a low-level recording that is not distorted and tends to be unimpressive. In such cases, a multi-track recorder can record at different level settings and edit out the best parts of each recording to ensure the power of the recording. As an example, let's say you have recorded an explosion of gasoline in a drum. The recorder has 8 tracks, and three types of 2-CH microphones are set up to record the peak component, the main explosion component, and the reverberating component, and the best parts of each are combined.
⚫️ Once recording begins, keep the recording level constant.
Once you have set the recording level for later editing, keep it constant during recording unless you are afraid that it will not connect well during the editing stage. This is to avoid the possibility of losing the connection during the editing stage.
g Background Noise Prevention for Indoor Recording
Even when recording indoors, pay attention to equipment that may be a source of background noise. If possible, turn off the power supply, cover it with a blanket, etc. during recording to ensure good signal-to-noise ratio. Possible indoor noise sources include rumble noise from air conditioning units. Clocks. Fluorescent light ballast noise. Refrigerators, TV sets, etc.
h Recording with two types of recording in principle: close-up and wide.
In 2CH stereo recording, two types of recording are used as a basic principle: one is close up to the target sound source to reveal details, and the other is slightly further away to reveal the overall atmosphere of the sound source. This allows for a variety of uses, such as close-ups, long atmospheres, or a mix of both, depending on the content. This is especially effective for materials such as physical machines.
There is a latest recording technique that use 8trck recorders so far to deferent set up potions enable to record all at once..
i Measures to cope with changes in weather conditions such as rain, high temperature and humidity, etc.
In order to ensure accurate recording even in environments such as sudden rain or high temperature and humidity in the tropics, care must be taken with cables, connector terminals, recorder covers, etc. Use a tube-type plastic bag to cover connector terminals, and use a sturdy cover for the recorder from a manufacturer that produces special covers instead of the supplied covers for the recorder.
j For natural sounds, select the best location for stereo/surround recording
For natural sound, for 2CH stereo recording, there is no problem if you aim at the sound source target as it is. For surround sound recording, find a position where the sound sources are evenly distributed in 360 degrees as much as possible, or find a position where you can get a sense of spaciousness, for example, where there are reflections behind one main sound source. The main microphone arrangement for the purpose of surround recording includes the following methods, each of which has its own characteristics in the recorded sound field.
Comment:basic 4ch RECORDING MIKING
◎ One-point surround microphone
The one-point surround microphone can output at least 4 to 5 channels or even more in a single body. It is advantageous in terms of installation and mobility. The sound field is a little narrower.

◎ W-AB
This is a microphone arrangement that expands the 2-CH stereo A-B system to the front and rear sides. The advantage is that you can record at the desired angle and distance with the microphone of your choice.
Installation is slightly larger in terms of equipment compared to the one-point arrangement.

◎ W-XY
This is also a 2-CH stereo X-Y system extended to the front and rear sides. This method is advantageous when the sound source is to be expressed clearly. The microphone can control the spaciousness by adjusting the X-Y spacing, but it does not have the same flexibility as W-AB.

◎ W-M/S
This is also a 2-CH stereo M/S system with an additional cardioid microphone for S for the rear, an omnidirectional microphone for M, and a total of three microphones via a matrix circuit to realize 4-CH recording.

◎ W-ORTF
This is also a microphone arrangement that expands the 2-CH stereo ORTF method to the front and rear, providing both a sense of spaciousness and localization of the sound field.

◎ IRT-X
This is an arrangement in which a small microphone is attached to the tip of a 25cm X-shape microphone, which is small, lightweight, and mobile, and has advantages in recording ambiance sounds.

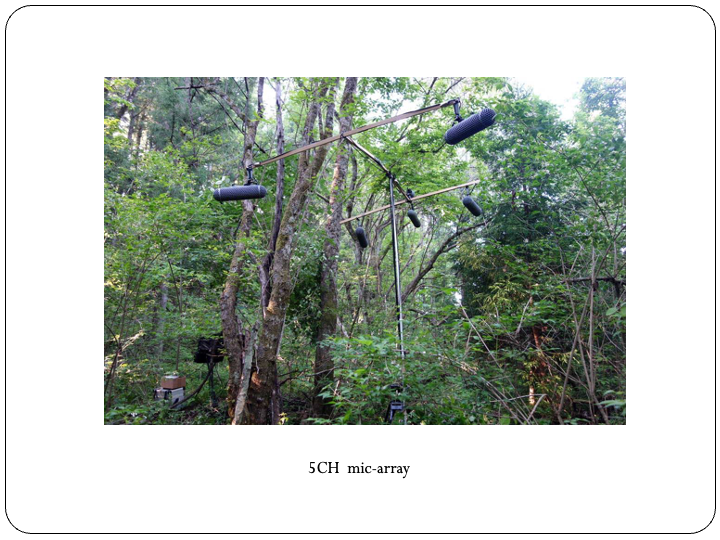
◎ Array Method
Microphones are attached by combining bars. This is also characterized by the ability to select the desired microphone and directivity, but the larger the array, the more care must be taken in its installation.

k A sound field in which space is established in three dimensions.
⚫️ This is effective for closed-space sound sources. Forests surrounded by trees, caves, bamboo groves, rain, etc. are particularly suitable for such spaces, especially when there are sufficient sound sources above. Curiously, sound recorded at the right point can also be perceived as height information.


⚫️ A horizontally developed and OPEN sound field.
This is a beach, a river bank, or a meadow with a clear field of view. In this case, the sound field will be open above, so select a point where the sound can be recorded at an even level on a horizontal plane as much as possible. Especially on the coast, the sound of waves usually comes from the front only, and there is usually only a small rear component due to the presence of a sand forest. In such cases, a 4-channel frontal microphone arrangement is used to record the sound of the waves. Another way to enjoy the surround sound field is to enter the waves with the entire equipment and record at the point where the waves pass around the microphones.


n either case, you must carefully select a location where you can get a uniform level in 360 degrees, or where there are separate sounds in all directions.
When we are used to stereo recording, our ears tend to focus only on the front, but it is important to always select a location where there is a well-balanced sound source in all directions.

No comments:
Post a Comment